Tuesday, May 31, 2011

Goonies Cufflinks and The Cardbox


The day of the wedding I had a special surprise for Matt. During my etsy expedition, I had found these awesome cufflinks I wanted to get for him. Granted, he doesn't wear cufflinks often (read never), but this was our special day, and they were so cool!

Black and White Goonies Cufflinks - Wedding Day Groomsmen Gifts Men
I did not order them right away, I just tucked them away in my favorites to keep in mind as the day got closer. Imagine my surprise months later when I went to order them and the etsy shop had closed! After some searching I was able to find the seller had gone and set up their own site and I was back in business.

Bella Moda Co. is very cool! They not only do custom cufflinks, but they have also started doing some bridal design. After I started browsing through the site, I almost had a hard time getting Matt just one pair of their cool cufflinks. I was also glad to know that each pair was made to order, so even though I didn't make it myself, it kept in line with the whole diy thing I had going on.

I do believe they are the coolest things I've ever seen. Like I said before, Matt loves all things pirate. The Goonies is one of his favorite movies and the line seemed fitting enough on our wedding day, plus, they matched our black and white color scheme.

Needless to say, he loved them. He was also very surprised, which was the goal. I love surprises!

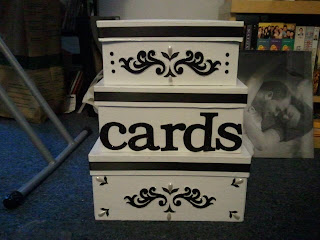
Next up, the cardbox. I spent weeks trying to figure out how to make this thing. Then one day, I just jumped in. I got paper mache nesting boxes from Michaels, along with some glossy white spray paint, some scrapbook stickers to decorate and black satin ribbon.

Matt first painted the boxes for me using primer, then we spray painted them to make them a pretty glossy white. After I let the paint set for a couple days, I cut holes in the bottom and top of the boxes so the cards would fall to the bottom box. I used Aleenes Tacky Glue to glue the boxes together. At this point, I should tell you that a hot glue gun would have been a wonderful asset to me, but you will be amazed to know I did not own a glue gun until two days before the wedding. Wow, I know, I don't know how I've survived all this time without a glue gun in my life.

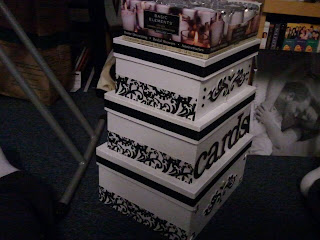
After the glue set on the boxes, I got ready to decorate the bugger. First, I used double sided tape around each lid to attach my black satin ribbon. On the middle box, I got some peel n' stick black glitter scrapbook letters and put 'cards'. On the top and bottom boxes I used some fancy swirly things I found in the scrapbook aisle. Again, peel n' stick, all about the peel n' stick!

At this point, I thought I was done. I hadn't planned on doing anything to the sides of the boxes until I noticed a rogue piece of double sided tape. Of course, I had to get it off and crap!, the paint peeled off. In repair mode, I ran double sided tape on all three sides of the boxes and covered up my flub with the same damask sheer ribbon I used in our centerpieces. Crisis averted!

I have to tell you, this box cost maybe ten dollars for me to make. I've seen them online being sold for $100!! Granted, they were probably a bit more fancy than mine, but seriously?!
Published with Blogger-droid v1.6.8
Friday, May 27, 2011

Matts Bout....More Felt Flowers!

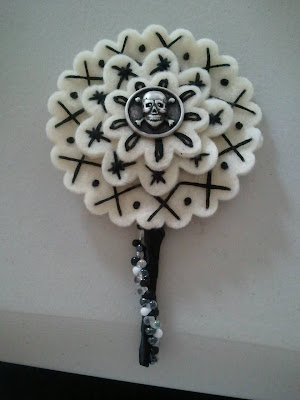
I made Matts bout pretty much the same way as my bouquet. He wore a black jacket so I used only white flowers embroidered with black thread. After wrapping the wire stem in black satin ribbon I thought it looked alittle plain. Plus, it would need to stand out from the jacket so I decided to jazz it up with some beads I found in my stash from my trip to Mystic last October. I randomly threaded them onto some beading wire and then just kind of wound them onto the stem until I liked it and then glued it in place with some Aleenes Tacky Glue.

Side note: I didn't finish this until the Thursday before the wedding. I first hot glued the beads in place and the panicked when the hot glue dried and the beads hadn't stuck. The Aleenes worked perfectly but I had to finagle a clamp using a book and a vase (don't ask) so the bead strand would stay in place until the glue dried.

I know you're probably looking at the button going, "what is that?". Well, Matt likes pirates. Loves anything pirate. So, when I found these buttons at Joanns I had to snatch them up! They were the closest thing i could find to pirate and when I showed them to him, he really liked them. Also, it was OUR wedding and I wanted it to reflect both of our tastes.

I think a lot of times weddings are all about the bride and sometimes the groom gets lost in the shuffle. Its even easier to do when you are doing a diy wedding and only one of you is crafty. So, I felt it was really important during the whole process to keep Matt involved in thinking out my ideas, letting him choose things that he liked and making them work even if it wasn't really my taste.

And that's Matts bout! It was one of my favorite projects. Probably because it was one of the easiest for me to do, haha. I really love the beaded stem. Amazing how such a small thing really changed the whole look!

Along with his bout, I got Matt a special gift that I gave him the day of the wedding. Until next time!
Published with Blogger-droid v1.6.8
Thursday, May 26, 2011

Felt Flower Bouquet Details

Hello Everyone!!

Well, the wedding is over and it was an amazing day/night!! Matt and I had such a wonderful day full of wonderful memories. Thinking back, neither of us could think of one thing that we would have changed or done differently. It was exactly the low key, intimate affair that we wanted from the very beginning and we didn't let anything or anyone deter us from that path.

I have had alot of questions about the materials for my bouquet and where I got my ideas. I owe alot of my inspiration for all my diy projects to etsy.com. This website is chock full of so many talented people, it would take years to muddle through all the amazing things that you can find there. I think the best part about etsy is  that no matter the product, pretty much anything can be customized. And every seller I contacted, even if I just had a question, was always nice and helpful. One seller, Really Bad Kitty, was my main inspiration behind my bouquet design. Their creations are sooo amazing and they are even available to do custom work to match your wedding colors and/or themes! I was also awed by this bouquet designer from Australia. Her button bouquets were the first non floral ideas I saw when I started my wedding planning and as soon as I saw her work, I knew that this was the way I wanted to go with my own bouquet. Honestly, if I had had the time or the means (and been less of a control freak), these ladies would have been my top choices in ordering my bouquet.

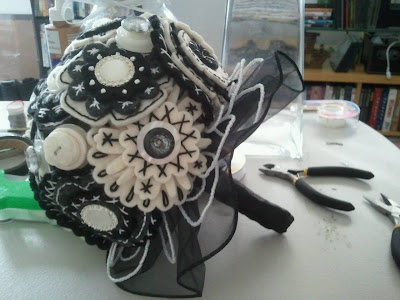
My bouquet was made up of felt flowers that I ordered from a vendor that already had them die cut. Once they arrived, I got to work hand embroidering each flower. After much experimenting, I realized I had to double the flowers so that they were stable and did not get all floppy when I put them together. After embroidering the flowers, I then assembled them using floral wire, using buttons as the centers. Most of my fancy buttons came from Joann Fabrics, I got lucky alot hitting their buy one,  get one free sales.

If you are wondering about the time I spent working on my bouquet, I would have to say, I started planning my bouquet as soon as we got engaged last February. We have always known we would not be having flowers in our wedding, so right away I was trying to think of different materials I could use in my bouquet. I wanted non floral, which also meant no silk. Etsy was my first stop. The first bouquets I saw were the ones made entirely for buttons, oh yea, I could do that! But, you cannot imagine the difficulty it takes to get THAT many buttons together. It was pretty darn impossible for me. I needed, literally, thousands of buttons. It just wasn't happening. So back to Etsy I went, and thats when I found the felt flower bouquets. A lot of people are not in to felt, I am one of them. I have always thought that felt was just a little too kiddish, alittle too hippy, alittle too....bleh, dare I say tacky? But, it was Christmas time now, I was getting down to the wire and didn't have alot of time left to figure this stuff out. So, I just went with it. And, looking back, I do not regret it. The  felt I received from the Etsy seller was very nice, easy to work with and looked wonderful when finished! By February, I was in full stitching mode getting all the flowers embroidered and ready for assembly. By the beginning of May, I had started putting flowers together on the wire with the button centers.

The week before the wedding, I had my MOH's bouquet and my own bouquet put together using floral tape. I decided that mine needed alittle something extra so I dug out some white beads and made some wire loops to tape around the outside making a collar. I also had some wide, black wired sheer ribbon that used on both bouquets to make another collar. I just cut a long length of ribbon and on one side, pulled the wire out to make it ruffle up. Then I hot glued it around the handle. I used black satin ribbon to wrap the handle. On the day of the wedding, I borrowed a brooch from my MIL and used it to decorate the handle of my bouquet.

And that's it! Everyone at the wedding really loved my bouquet and I received lots of compliments. It was something that none of them had ever seen and it really fit into our wedding. It was me, it was handmade, it was beautiful, it was different.

I have alot of pictures and ideas that I used in my wedding that I would love to share with everyone!! I realized I have not shared Matts boutonniere, so that is definitely going to be in the next post!! It was actually one of my favorite finished projects!

Hope you all are well and have a great holiday weekend!

Wednesday, May 18, 2011

Wedding Time!

Hello everyone!

Just wanted to stop in for a quick hello before the weekend kicks into gear. My wedding is Saturday night!! I've been in work mode for the last week or so trying to get all my diy projects done.

I JUST finished my bouquet and wanted to share it with you. Its been a long work in progress. From spending almost the whole year trying to plan the process and since Christmas, I've been working on embroidering the flowers. I am extremely pleased with the result and will enjoy having it as a reminder of my big day displayed for years to come!

I have off work until next wednesday so I am definitely looking forward to the crazy days ahead followed by relaxing at a lovely b and b with my new husband!
Published with Blogger-droid v1.6.8
Friday, May 13, 2011

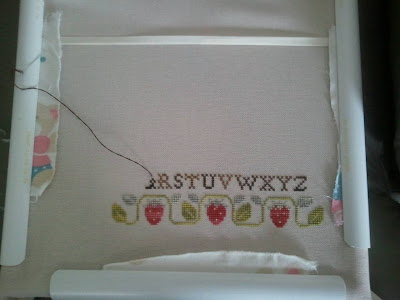
Alphanet done!

While watching greys and updating my ipod last night I took some time to put more stitches into virtue.

The alphabet is all done! Now for the fun stuff!

Hopefully this weekend I will be done some of my wedding projects.
Published with Blogger-droid v1.6.8

Wednesday, May 11, 2011

Virtue Sampler

I started this sampler by LHN on my brunch date with Danielle. I'm stitching it on 32 ct. mushroom lugana. I like it so far, the colors are very nice and I never have any complaints about crescent colours thread!

Probably won't be working on it much for the next week or so with the wedding fast approaching. I have a few projects to wrap up and then I will be free!

Cross some stitches for me!
Published with Blogger-droid v1.6.8
Friday, May 6, 2011

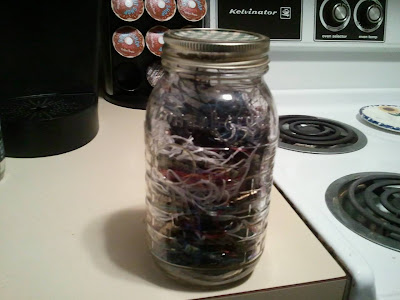
TUSAL.....finally

I kept forgetting to snap a picture of my TUSAL jar the last couple days, so this morning I made it a point to get a quick snap before I left for work.

No stitching so far this week. Last night I was working on my centerpieces. I looove them! They are turning out exactly the way I wanted them to be! But, of course, I got to my last one to assemble and ran out of ribbon AND double sided tape.

Hopefully, this weekend I can give myself a break and put in some stitches.

Published with Blogger-droid v1.6.8
Tuesday, May 3, 2011

Sorry!

It has been two weeks since my last post! I can't believe that much time has gone by so fast, it certainly doesn't feel like two weeks.

I first have to send a very special thank you to Astrid, who sent me a very cute handmade Easter card. It was such a nice surprise to receive and it is still propped up in the kitchen for all to see. I will have to post a picture later tonight when I get home.

Not much stitching has been going on in my house. Last week, I scrambled to finish working on the section I wanted to finish for the round robin I am in this year. I put the last stitch in it Friday night while Matt was working, and I mailed it out Saturday afternoon.

On the wedding front I had my first dress fitting, our engagement pictures are AMAZING, and I am slowly, but surely getting all  those diy projects done. I had a slight panic when I tried to order the vases I wanted from The Dollar Tree and I found out they were backordered for 30 days! Thankfully, I was able to find others that were similar on the website and crushed my procrastination by ordering them as soon as I found them.

This past Saturday, I gave myself a break from it all and decided to meet up with Danielle at Panera Bread for some yummy food and stitching fun. It was so nice to hang out with her and work on a project I was under no pressure to finish anytime soon.

Well, best get some work done! I will be back tonight to post my TUSAL jar and maybe some pictures!!

Hope you all are doing well!